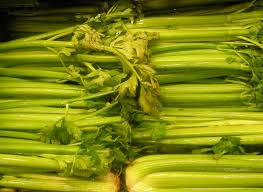
Celery, with its crisp texture and distinctive flavor, is a versatile vegetable that finds its way into countless recipes. While it’s readily available in stores, there’s something special about growing your own. Not only does homegrown celery often taste better, but it also allows you to control the growing conditions, ensuring a pesticide-free crop. In this comprehensive guide, we’ll take you through every step of the celery growing process, from seed selection to harvest and storage. Whether you’re a seasoned gardener or a beginner, this post will equip you with all the knowledge you need to successfully grow celery in your own garden
Before we dive into the growing process, let’s take a moment to understand the plant we’re working with. Celery (Apium graveolens) is a member of the Apiaceae family, which also includes carrots, parsley, and fennel. It’s a biennial plant grown as an annual for its edible stalks and leaves. Celery prefers cool weather and requires a long growing season, typically 120 to 140 days from seed to harvest.
- Choosing the Right Variety:
There are several celery varieties to choose from, each with its own characteristics:
- Pascal: The most common type, known for its green stalks and mild flavor.
- Golden Self-Blanching: Easier to grow and naturally lighter in color.
- Celeriac: Grown for its root rather than stalks.
- Red Celery: Offers a unique color and slightly spicier flavor.
Consider your climate, available space, and personal preferences when selecting a variety.
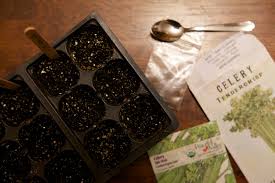
Starting from Seed:
Celery seeds are tiny and can be challenging to germinate, but with the right approach, you can achieve success.
Timing: Start your seeds indoors 10-12 weeks before the last expected frost date in your area. Celery has a long growing season, so getting an early start is crucial.
Materials needed:
- High-quality seed starting mix
- Small pots or seed trays
- Clear plastic wrap or dome lids
- Grow lights or a sunny windowsill
Steps: a) Fill your containers with moistened seed starting mix. b) Sow seeds on the surface of the soil. Due to their small size, mix them with sand for easier distribution. c) Lightly press the seeds into the soil but don’t cover them, as they need light to germinate. d) Mist the soil surface gently to ensure good seed-to-soil contact. e) Cover the containers with clear plastic to maintain humidity. f) Place in a warm location (70°F/21°C is ideal) and keep the soil consistently moist. g) Germination typically occurs in 7-14 days. Once you see sprouts, remove the plastic cover.
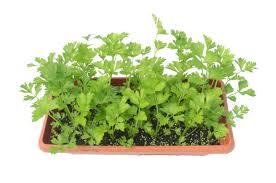
- Caring for Seedlings:
Once your seeds have germinated, it’s time to nurture those delicate seedlings into strong young plants.
Light: Provide plenty of light. If using a windowsill, ensure it’s south-facing. Otherwise, use grow lights positioned 2-3 inches above the seedlings for 14-16 hours a day.
Temperature: Celery prefers cool temperatures. Once seedlings emerge, move them to a location with temperatures between 60-70°F (15-21°C).
Watering: Keep the soil consistently moist but not waterlogged. Water from the bottom to encourage strong root growth.
Fertilizing: When seedlings develop their first true leaves, begin feeding with a half-strength, water-soluble fertilizer every two weeks.
Thinning: When seedlings are about 2 inches tall, thin them to one plant per cell or pot. Choose the strongest seedling and snip others at the soil level.

Preparing for Transplanting:
As your seedlings grow, they’ll need to be prepared for life outdoors.
Hardening off: About two weeks before your planned transplant date, start the hardening off process. This involves gradually exposing your plants to outdoor conditions:
- Day 1-2: Place seedlings outside in a sheltered spot for 2-3 hours.
- Day 3-4: Increase outdoor time to 4-5 hours, introducing some direct sunlight.
- Day 5-6: Leave plants out for 6-8 hours, with more direct sunlight.
- Day 7: Leave plants out all day, bringing them in at night.
- Day 8-14: Leave plants out day and night, unless frost is expected.
Transplanting Outdoors:
When seedlings are 6-8 inches tall and have been properly hardened off, they’re ready for transplanting.
Soil preparation: Celery prefers rich, well-draining soil with a pH between 6.0 and 7.0. Work in plenty of compost or well-rotted manure before planting.
Timing: Transplant when outdoor temperatures consistently stay above 50°F (10°C), usually 2-3 weeks before the last frost date.
Spacing: Plant seedlings 8-10 inches apart in rows 2-3 feet apart. This spacing allows for good air circulation, which is crucial for preventing disease.
Planting depth: Set plants at the same depth they were growing in their containers.
Care for celery
Now that your celery is in the ground, it needs consistent care to thrive.
Watering: Celery has shallow roots and requires consistent moisture. Water deeply and regularly, aiming to keep the soil evenly moist but not waterlogged. Mulching can help retain soil moisture.
Fertilizing: Feed your celery plants every 2-3 weeks with a balanced, water-soluble fertilizer. Alternatively, use compost tea or other organic fertilizers.
Weeding: Keep the area around your celery plants free from weeds, which compete for nutrients and water.
Feed your celery
- Celery is a heavy feeder and benefits from regular fertilization:
- Apply a balanced, water-soluble fertilizer every 2-3 weeks
- Side-dress with compost or aged manure midway through the growing season
- Avoid high-nitrogen fertilizers, which can lead to excessive leaf growth
Blanching for Tender Stalks
Blanching can produce paler, more tender stalks:
- When plants are nearly mature, wrap stalks with paper or cardboard
- Alternatively, mound soil around the base of the plants
- Leave the tops exposed and continue for 10-14 days before harvest
Pest and Disease Management
Stay vigilant against common celery pests and diseases:
- Watch for aphids, slugs, and celery leaf miners
- Use row covers to protect against pests
- Ensure good air circulation to prevent fungal diseases
- Practice crop rotation to reduce disease pressure
Harvesting Your Celery
Proper harvesting ensures the best flavor and texture:
- Begin harvesting when stalks are about 8 inches tall
- Cut outer stalks at the base, allowing inner stalks to continue growing
- For a final harvest, cut the entire plant at ground level
- Harvest before temperatures drop below 50°F (10°C) to avoid bitterness
- Extend the Season
Prolong your celery harvest with these techniques:
- Use row covers or cold frames to protect plants from early frosts
- In milder climates, sow a second crop in late summer for fall harvest
- Consider growing celery in a greenhouse for year-round production
- Storage and Use
Maximize the lifespan of your harvested celery:
- Store unwashed celery in the refrigerator, wrapped in damp paper towels
- For longer storage, cut stalks into pieces and freeze
- Use celery leaves in soups, stews, or as a herb-like garnish
- Troubleshooting Common Issues
Address these common problems for healthier celery:
- Bitter taste: Usually due to heat stress or lack of water. Ensure consistent moisture and consider partial shade in hot climates.
- Hollow stalks: Often caused by uneven watering. Maintain consistent soil moisture.
- Stunted growth: May indicate nutrient deficiency. Ensure regular fertilization and rich soil.
Growing celery may require some patience and attention to detail, but the reward of crisp, flavorful, homegrown stalks is well worth the effort. By following this guide, you’ll be well-equipped to nurture your celery plants from seed to harvest. Remember, gardening is as much about the journey as it is about the destination. Each season brings new learning opportunities and the chance to refine your techniques. So get your hands dirty, enjoy the process, and soon you’ll be savoring the fruits of your labor in your favorite recipes. Happy gardening!