How to Grow More String of Hearts Plants with the Butterfly Propagation Method
The Butterfly Method for Propagating Heart Plants
Have you ever seen those beautiful strings of heart-shaped leaves cascading from hanging baskets and wondered how to multiply your own heart plant collection? Known by their botanical name Setcreasea pallida, heart plants are loved for their vivid pink, red, and white variegated foliage. With the right propagation technique, you can grow many new heart plants from just one parent plant. In this article, I’ll explain the butterfly method for propagating heart plants by stem cuttings.
What is the Butterfly Method?
- The butterfly method gets its name because the cut stem resembles the shape of a butterfly. It involves making two diagonal cuts on either side of a stem node to create four segments with leaves.
- By disturbing the plant hormones at the node, this setup tricks the plant into believing it has been damaged and prompts it to form roots at the exposed areas.
- Within a few weeks, new roots should start to sprout from the diagonal cut areas, allowing each segment to develop into an independent plantlet.
Why Use this Method?
There are a few key advantages to propagating heart plants using the butterfly method:
- It allows you to get multiple new plantlets from just one original stem cutting, multiplying your plant stock efficiently.
- The diagonal cuts increase the surface area exposed to rooting hormones, so roots tend to form more reliably compared to a single straight cut.
- By leaving a section of the original stem intact between the leaf nodes, the plant segments have a built-in support structure as roots develop.
- The leafy sections help the segments retain moisture as they establish themselves, improving survival rates for the new clones.
Step-by-Step Instructions
Here is a simple step-by-step guide to propagating heart plants using the butterfly method:
- Select stem cuttings from a healthy mother plant. Hearts will root most reliably from new green growth, so choose long, flexible stems with 3-5 intact leaf nodes.
- Use clean, sharp sterilized pruners or scissors to make a slanting 45-degree cut just below a leaf node. Leave about 1-2 inches of stem remaining.
- Make a matching diagonal cut on the opposite side of the node, creating four leafy triangular segments attached to a thin strip of stem.
- Fill small pots or cells with a loose, well-draining rooting medium like perlite or coarse sand. Make a hole in the medium and insert each stem segment cluster so the top leaf nodes are exposed.
- Mist the cuttings thoroughly and place under a humid dome or in a plastic bag to retain moisture as roots develop. Keep warm at 70-80°F in bright, indirect light.
- Check for new root growth in 2-4 weeks. When roots are 1-2 inches long, pot up rooted cuttings in moist soilless potting mix. Water sparingly until established.
Tips for Success
Here are some additional tips I’ve picked up from experience to help ensure your heart plant propagation has the best chance of success:
- Be diligent about keeping cuttings and rooting media constantly moist as root initials form. Under-watering is the top reason for failure.
- Use a rooting hormone powder or liquid on the fresh cuts to stimulate quicker rooting. I find this makes a noticeable difference.
- Consider bottom heating your rooting setup with heat mats or cables set to 70-80°F to speed up the rooting process.
- Once new growth appears, harden off rooted cuttings gradually before shifting to outdoor conditions to avoid shock.
- Prune off flower spikes that form to direct all energy into root development instead of premature blooming.
- Be patient! While hearts are fairly easy to root, it can still take 4-6 weeks to see solid new growth from cuttings.
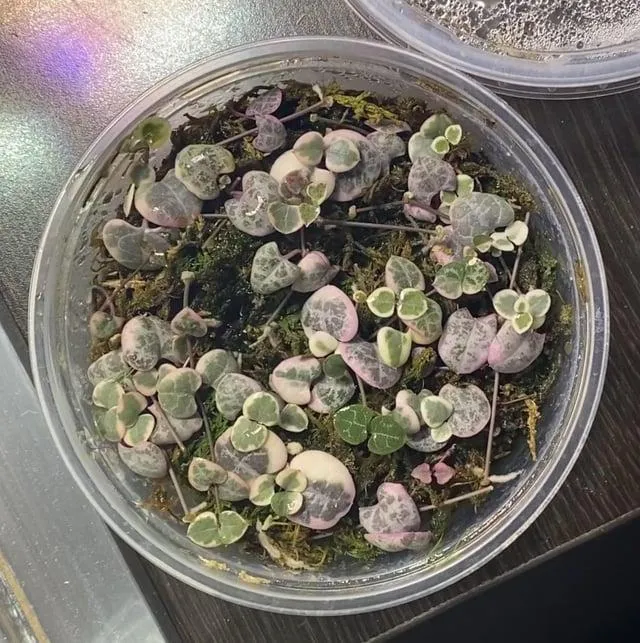
A Real-Life Propagation Project
Let me tell you about a propagation project I undertook last spring using this butterfly method. I had a large trailing heart plant in a hanging basket that had gotten quite leggy overwinter. Rather than prune it back harshly, I decided to try propagating some new plants from the long vine-like stems.

I selected around 15 stems 12-18 inches in length and carefully cut them into butterfly segments following the instructions above. I laid them out on a tray of perlite, sealed it tightly with clear plastic wrap, and settled in to watch for new growth. Within 3 weeks, I started seeing little white nubbins poking up all along the diagonal cuts. Another week or so and lush new leaves emerged.
By mid-summer, I had over 60 rooted heart plantlets bursting with pink variegated foliage ready for repotting. I gave many away to friends and family and used the rest to fill out my own garden. It was incredibly satisfying to turn one mother plant into such a bountiful crop! From that success, propagating cuttings by the butterfly method has become my go-to technique for increasing my collection of favorite houseplants.
Frequently Asked Questions
Q: Can I propagate heart plants from leaf cuttings instead of stems?
A: While it’s theoretically possible to root heart plants from leaf cuttings, the success rate tends to be quite low unless conditions are optimal. Stems have more hormonal cues guiding root formation, so they are generally a much more reliable choice.
Q: How do I overwinter heart plants indoors after being outside in summer?

When nighttime temperatures start dipping down, gradually move your potted heart plants back indoors to a sunny windowsill. Reduce watering slowly as days shorten. Cut back on fertilizer in fall. Hearts may drop leaves as days get shorter but will regrow come spring. Keep soil barely moist at 50-60°F over winter.
Q: My new heart plant props aren’t growing much. What’s wrong?
Newly rooted cuttings can go through an adjustment phase where growth is slow as they establish. Make sure they get adequate light, keep soil constantly moist but not soggy, provide humidity, and avoid chilling. It may simply be a waiting game – be patient and growth should start picking up within a couple months.
I hope this detailed guide has provided helpful answers for propagating heart plants using the butterfly method! Let me know if you have any other questions. With a bit of care, it’s an easy way to turn one plant into many beautiful new string of hearts for your collection.
String of Hearts Butterfly Propagation Method

| Method | Materials Needed | Timeframe | Success Rate |
|---|---|---|---|
| Leaf Cuttings | Healthy string of hearts leaves, moist soil, water | 4-6 weeks | 70-80% |
| Single Node Cuttings | Stem cuttings with 3-4 string of hearts beads, rooting hormone, potting soil | 6-8 weeks | 80-90% |
| Layering | Mature string of hearts stems, soil, clips or stakes | 2-3 months | 60-70% |
| Division | Established string of hearts plant, potting soil | Instant | Nearly 100% |
| Seeds | String of hearts seeds, potting soil, heat mat | 3-6 months | 50-60% |
FAQ
-
What is the propagate string of hearts butterfly method?
Basically, the propagate string of hearts butterfly method is a fun way to make a butterfly shape using only heart symbols. You start with one heart and “breed” more hearts by adding strings between them. It’s kinda like a little art project where the hearts multiply!
-
How does it work?
Well, to put it simply, you begin with a single heart. Then you draw a line from the bottom of that heart connecting to the top of a new heart below it. You repeat that to “produce” more hearts, forming the shape of a butterfly over time as the chain of hearts stretches outward in both directions. Pretty neat how it grows organically like that, huh?
-
What do you need to do it?
All you really need is a pen or pencil and some paper. Although I suppose if you wanted to get fancy you could use markers, glitter, stickers, or other craft supplies to decorate your butterfly creation. My friend once did it by gluing googly eyes on the hearts – it was totally hilarious but also kinda cute!
-
How long does it take?
The time it takes can vary a lot depending on how big or detailed you want your butterfly to be. A basic one might only take 10 or 15 minutes. But you could spend hours working on a really extensive propagate string of hearts butterfly if you added lots of extra strands between the hearts. It’s a good activity for kids since they’ll string along with it. Otherwise it might get tedious for adults after a while.
-
What’s the best paper to use?
For this project, pretty much any kind of paper will work. Regular printer paper is inexpensive and gets the job done. However, at the same time, colored paper or construction paper could make your design pop more. Cardstock would make the butterfly stronger and let it stand on its own. Some people have suggested tracing paper so you can see the layout without worrying about erasing mistakes. Go with what floats your boat!
-
Is there a right way to do it?
When you get down to it, I don’t think there’s a single right way to do the propagate string of hearts butterfly. Everyone’s version will turn out a little different. The general idea is the same, but you can tweak the design and be creative with how you string the hearts together. Maybe experiment with different patterns or add extra accents. I’d say as long as you’re having fun with it, then you’re doing it the right way!
-
What if I make a mistake?
Don’t stress too much about mistakes – they’re part of the process. You can usually fix small boo-boos by coloring over or trimming the paper. Sometimes working around an error leads to happy accidents that improve the outcome. My grandma used to say “No mistakes, only happy little accidents.” Obviously she wasn’t on Instagram trying to get likes! The point is, be forgiving of yourself and enjoy the journey of creation.
So in summary, the propagate string of hearts butterfly method is a fun and easy craft for all ages. With just a bit of paper and something to draw with, you can spend a relaxing time designing your own unique butterfly shape. The process is sort of unpredictable, like real life – so relax and go with the flow!